ConsentBit User Help Guide
ConsentBit User Help Guide
Introduction
Welcome to ConsentBit, your one-stop solution for cookie consent compliance with privacy regulations like GDPR and CCPA on your Webflow site. This quick guide will help you get started, explain the major features, and answer any questions you might have along the way. Whether you're new to cookie consent management or an experienced user, this guide provides step-by-step instructions to help you use ConsentBit effectively.
Table of Contents
- Overview
- User Onboarding
- Main Features
- UI & Account Management
- Consent & Privacy Management
- Notifications & Security
- Maintenance & Updates
- Performance & Reports
- Troubleshooting & FAQs
- Help & Support
Overview
ConsentBit is a Webflow-based Cookie Consent Management Platform (CMP) designed to help Webflow website owners ensure compliance with global privacy laws. Our platform helps website owners manage cookie consent for visitors from the EU (General Data Protection Regulation (GDPR)) and California residents (California Consumer Privacy Act (CCPA)) with ease
Key Features
- Consent Banner Types: Choose between a GDPR Compliant banner for EU visitors or a U.S. State Laws Compliant banner (including CCPA, CPRA, and more) to meet global privacy laws.
- Simple Configuration: Use a simple banner with just Accept and Reject buttons which is ideal for straightforward setups that don’t require detailed consent management
.png)
- Advanced Configuration: Choose between a GDPR-Compliant Banner or a U.S. State Laws-Compliant Banner, offering detailed, category-based consent options to meet stricter privacy regulations.
.png)
- Automatic Script Blocking: Automatically blocks non-essential cookies and scripts from running until the user provides consent, ensuring compliance with global privacy regulations.
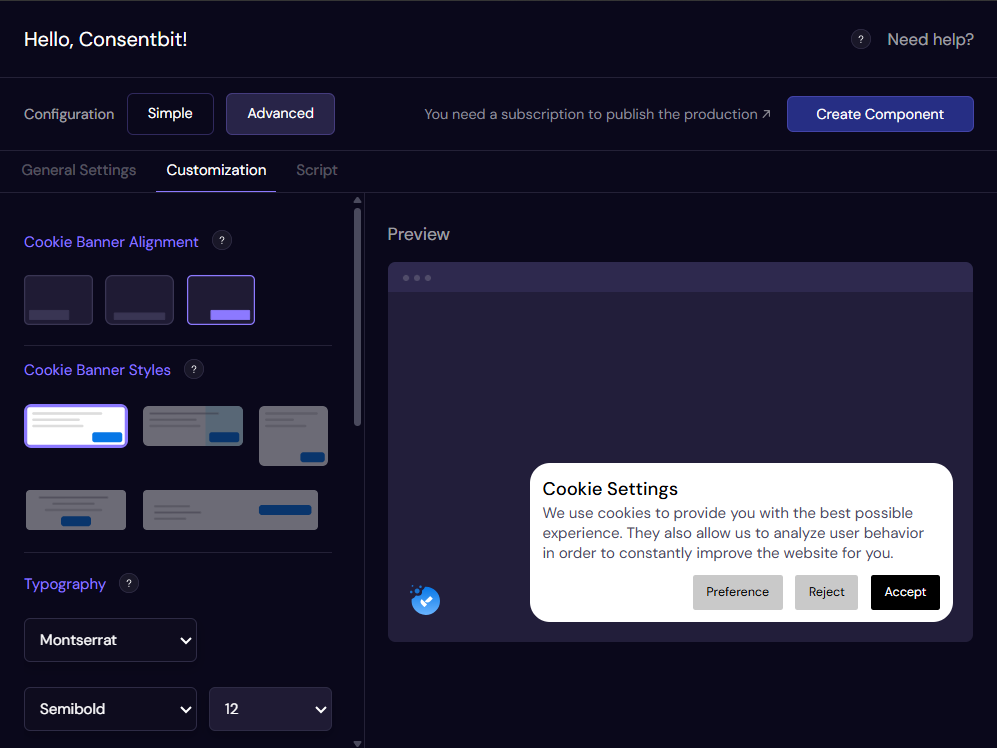
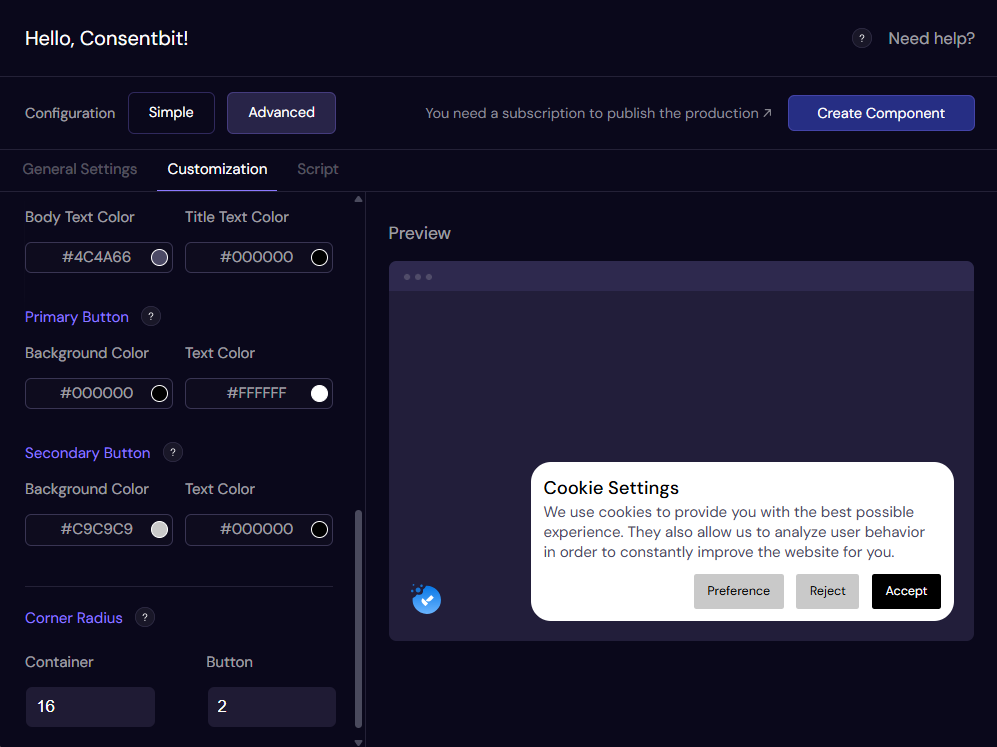
- Banner Customization: Modify the appearance of the banner to match your brand’s design using an easy-to-use and intuitive customization tab.
.png)
- Consent Management: Tracks user consent preferences and makes sure to turn scripts on accordingly.
- Multi-Language Support: Available in languages including English and Spanish to ensure worldwide accessibility.
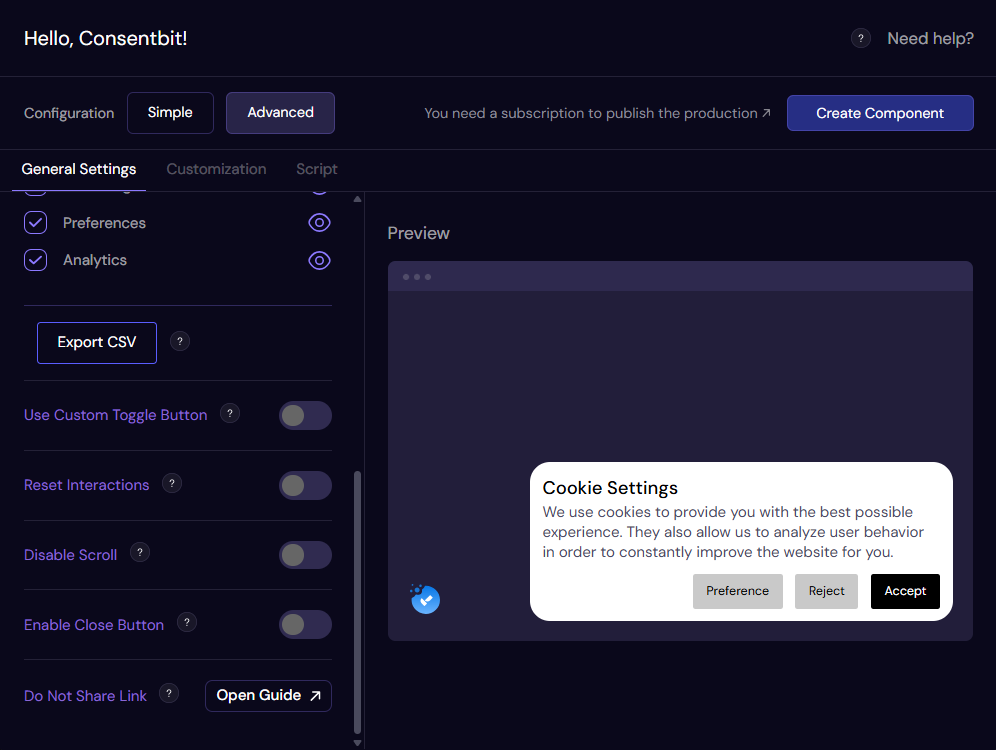
- Export Consent Data: In the General Settings section of both the Simple and Advanced configuration tabs, you’ll find an Export CSV button that allows you to download all consent data collected from users.
User Onboarding
Getting Started with ConsentBit
The onboarding process is designed to be simple and involves integrating the app with your Webflow site. Below is a step-by-step guide to get you started:
Step 1: Install the App
1. Go to the Webflow Marketplace and search for ConsentBit.
2. Install the app, and you'll be prompted with a Webflow authentication screen where you can select the site you want to install the app on.
3. Once the site is selected and the app is installed, you can launch the app directly from the Webflow Marketplace.
Step 2: Choose Your Consent Banner Type
After installing the app, you can configure your banner using two modes: Simple and Advanced.
Both modes support GDPR, CCPA, or both, and both allow customization options. The banner design is the same in both modes — the difference lies in the configuration options available.
Simple Mode
Provides a quick, minimal setup with fewer settings, ideal for getting your banner live quickly.
Advanced Mode
Includes all the options in Simple Mode, plus additional advanced settings such as the Script tab for managing scripts, and the CSV export feature for downloading consent data. Advanced Mode also offers deeper control over categories and user preferences.
Step 3: Confirm Your Selection
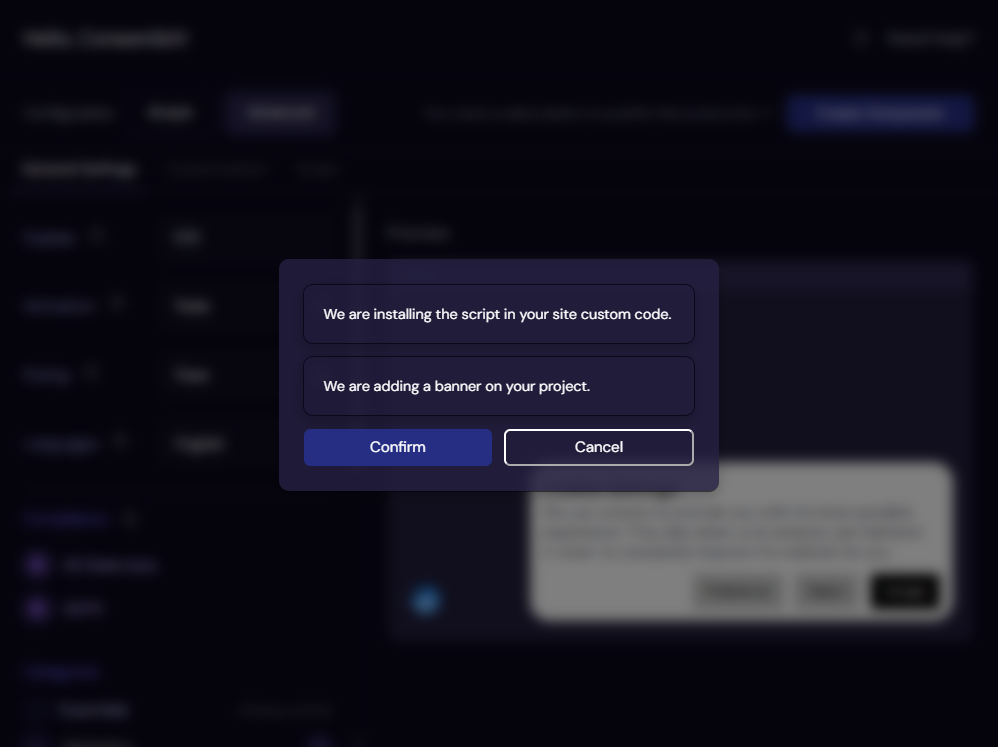
Once you’ve selected your configuration, first click “Create Component,” then click “Confirm.” This will add the corresponding script and banner, which will be visible on your website after publishing.
Advanced Mode for Full Control
For those who want more control, you can switch to Advanced Mode. Here, you'll be provided with a list of all the scripts that have been entered into your Webflow `<head>` as analyzed by ConsentBit. You can then turn all your scripts into one of four categories: Essential, Marketing, Personalization, or Analytics under the Scripts Tab.
Uninstall the App
To uninstall the ConsentBit app, follow these steps:
- Go to Site Settings.
- Navigate to Apps and Integrations.
- Scroll down to the Connected Apps section.
- Here, you will see a list of apps that have access to your site.
- Click on Uninstall.
- Please note: Uninstalling ConsentBit will also remove the code added by the app during the setup process. However, any visual elements such as the cookie logo or banner added directly into the Webflow Designer will need to be manually deleted from your site.
Main Features: Key Features and How They Work
ConsentBit offers several features to help you customize the experience for your visitors and ensure compliance with privacy laws and regulations.
Banner Customization
Banner Animations & Behavior
- Add animations to the banner in both Simple and Advanced sections, controlling how it appears on your site.
- Set easing settings to smoothen the animation of your banner for a better user experience.
- Reset interactions: Users can reset the banner's initial interactions at any time by toggling the Reset Interaction option for added flexibility.
Automatic Script Management
Automatic Script Addition
After consent is provided, scripts are automatically added to the Webflow section, streamlining the setup process.
Cookie Expiration Time
- Set cookie expiration times by specifying the desired duration in the Expires input box, ensuring compliance with privacy regulations and user preferences.
- Choose banner type: Users can select GDPR, or CCPA banners based on their compliance needs.
Advanced Customization
Consent-Based Banner Display
The banner appears on the website according to the selected consent type, ensuring that privacy requirements are met before any tracking scripts are executed.
Two Configuration Modes: Simple & Advanced
Simple Mode: Provides an easy, minimal setup with fewer steps and settings, ideal for quickly getting your banner live.
Advanced Mode: Full control of the following categorization of scripts:
- Essential: Scripts required for website functionality.
- Marketing: Advertising and promotional scripts.
- Personalization: Scripts for user preferences.
- Analytics: Scripts for tracking user behavior.
Custom toggle buttons: In Advanced Mode, the use of custom toggle buttons allows users more control of consent.
Disable scroll option: This disables page scroll until the user has completed the consent choice, ensuring that the user must interact with the cookie consent banner before they can scroll through the rest of the page's content.
Script Scanning and Categorization
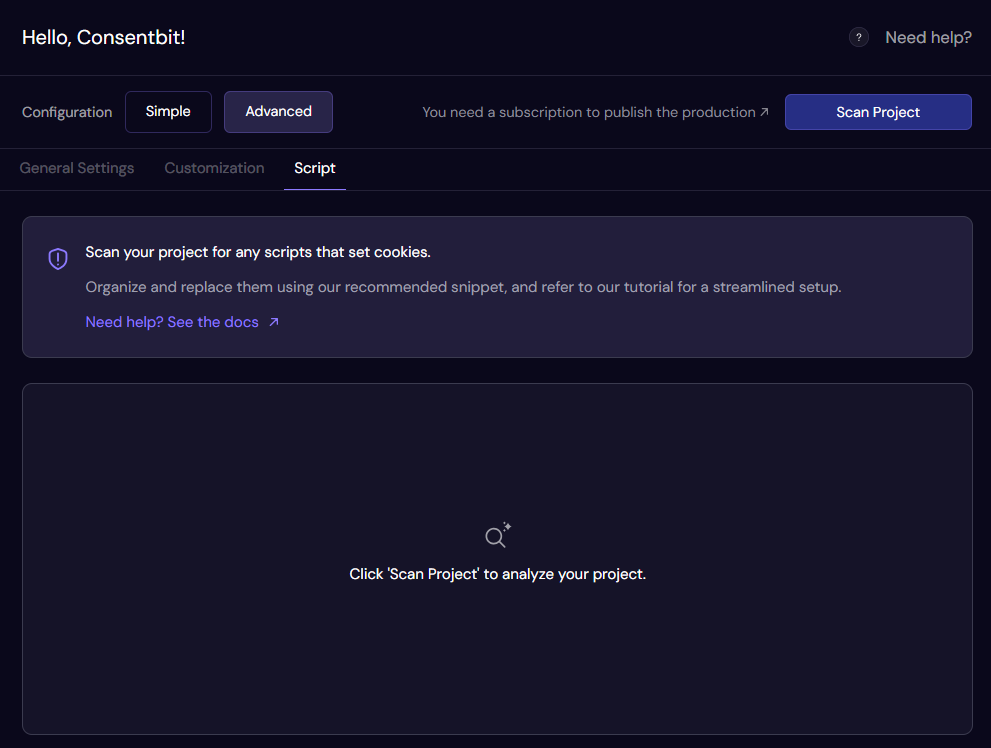
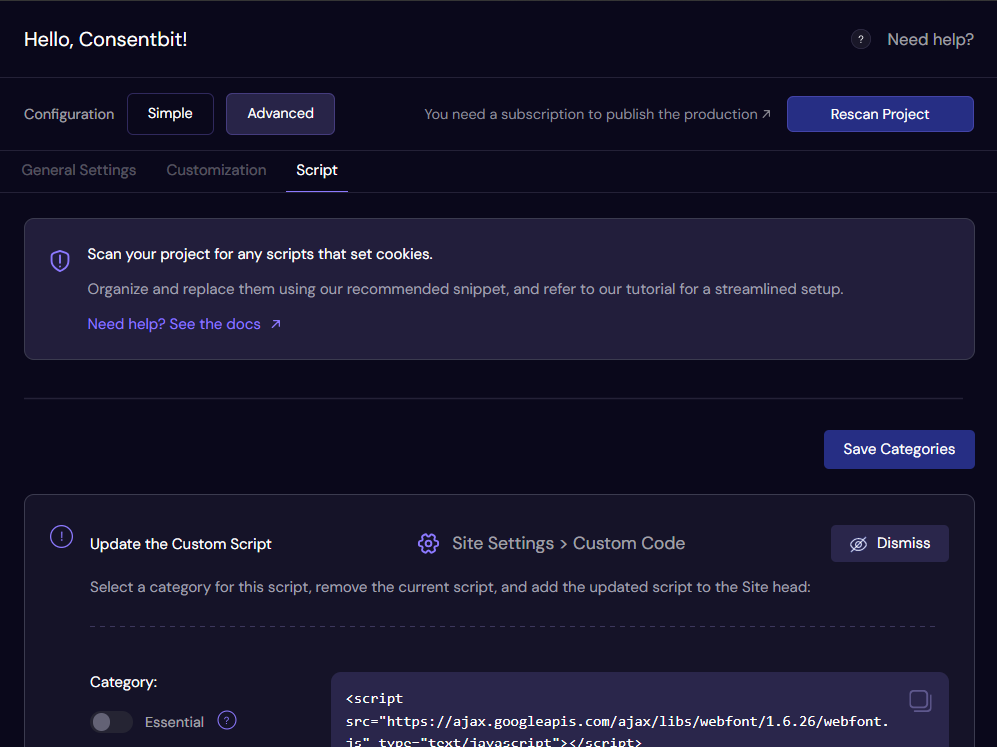
- Script Detection: When you click “Scan Project”, the app detects all scripts in your Webflow <head> section and displays them
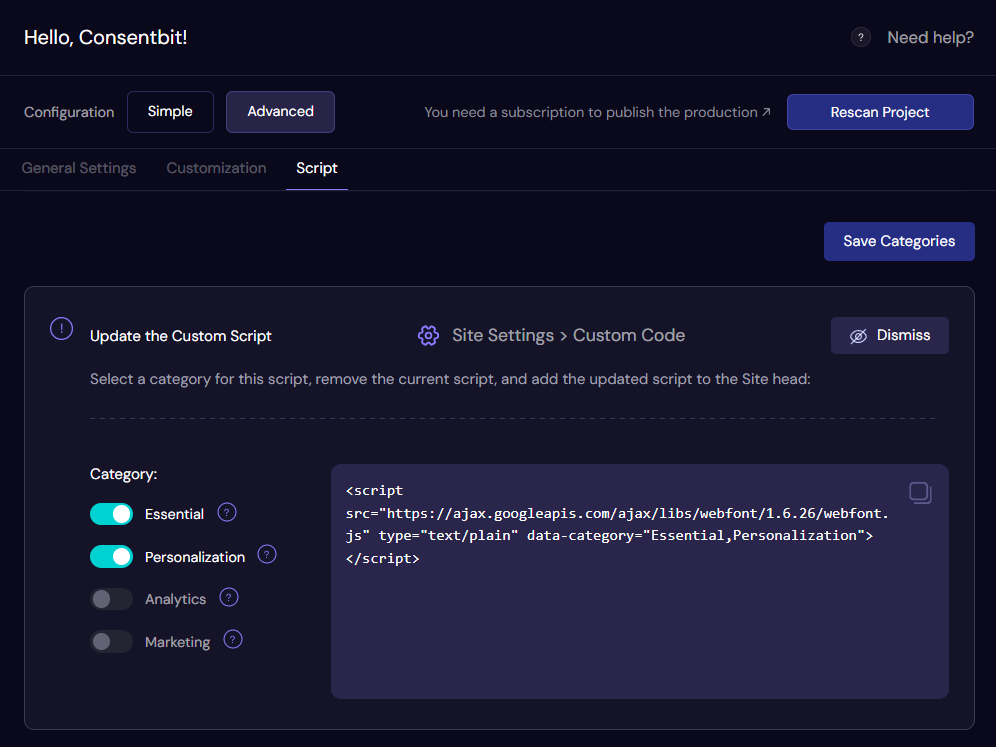
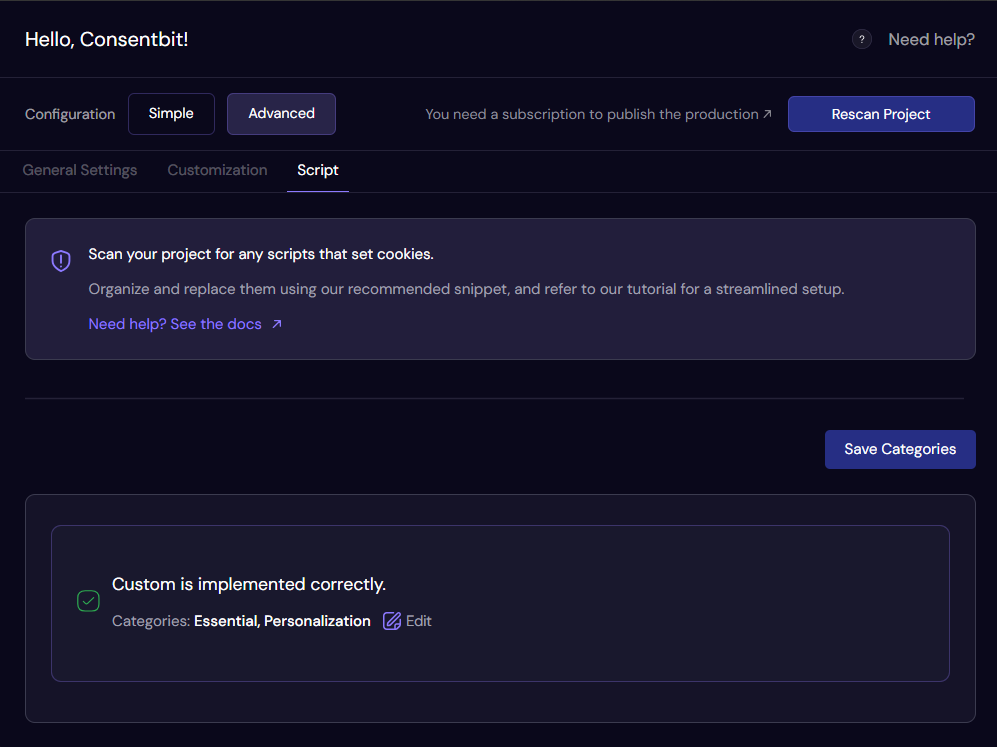
- Categorization: After scanning, scripts will show in the Scripts Tab. You can toggle the categories for each relevant script between Essential, Marketing, Personalization, or Analytics.
- Script Customization: To enable category-based control, you'll need to remove the original script from your Webflow Custom Code settings and replace it with the updated version provided in the UI.
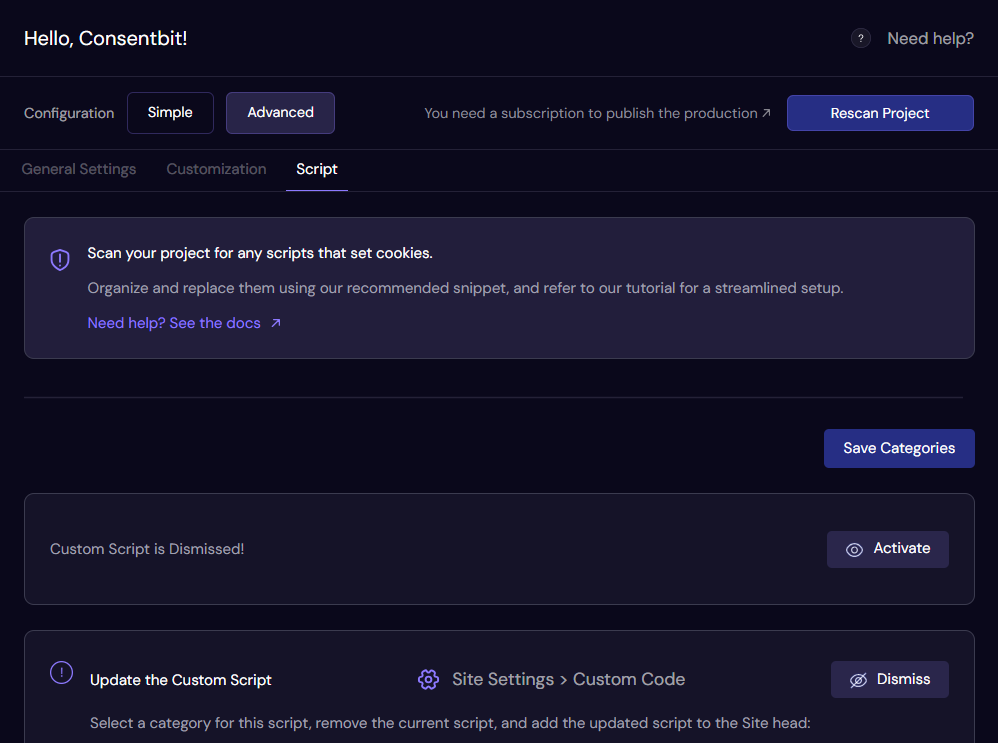
- Script Dismiss: There is also a feature that allows you to dismiss scripts that do not require cookie consent, ensuring that only the relevant scripts are active based on user consent.
Consent Management for GDPR & CCPA
ConsentBit allows you to choose if you want your banner to be compliant with either GDPR, CCPA, or both. Once a user makes their selections, ConsentBit updates the scripts to block them or activate them.
Automatic Script Blocking & Activation
- Blocking by Default: For GDPR compliance, all scripts that require cookie consent are blocked at the loading time by default, ensuring that no non-essential scripts are executed before user consent is obtained.
- CCPA Opt-out Model: CCPA follows a distinct opt-out model, where scripts are not blocked by default, and users are given clear options to opt out or limit data sharing if they choose, allowing data collection unless a user exercises their rights.
- Activation on Consent: Scripts will be activated only after the user provides consent for the corresponding category.
Language Support
ConsentBit provides multi-language support, ensuring that users worldwide can interact with the app in their preferred language.
UI & Account Management
User Interface (UI)
The ConsentBit interface should be simple and clean in layout. The key sections include:
- Banner Setting Configurations: Here you select and configure a consent banner, choosing between Simple and Advanced.
- General Settings: In the General Settings, users can customize options such as language selection, banner animations, consent categories, scroll disabling, and more.
- Scripts: Under the Scripts Tab, all scripts are scanned and displayed. Users can then categorize each script into the appropriate sections, such as Essential, Marketing, Personalization, or Analytics.
- Customization Tab: In the Customization Tab, users can easily change/modify the appearance of the installation by adjusting the fonts, text, color, banner alignment, and button styles to match the look and feel of the project.
Consent & Privacy Management
Consent Requests & Data Processing
Once a visitor enters your site, the following consent option is made available:
- Accept All Cookies: User consents to all cookies.
- Reject Non-Essential Cookies: In Simple Mode, the user rejects non-essential cookies.
- Customize Preferences: In Advanced Mode, the user may change consent by category (e.g., Accept/Reject for Analytics, Marketing, etc.).
Data Capture
Once the user makes a choice, ConsentBit:
- Captures consent information, including which categories have been accepted or rejected.
- Transfers it to a safe server for storage and compliance tracing.
- Stops or executes scripts in accordance with the user's inclinations.
Data Server-Side Storage and Consent Logging
Consent data is stored in a secure manner and complies with the privacy laws:
- Data Stored: IP Address (hashed or anonymized for GDPR compliance), Consent Preferences, Timestamp of Consent, Privacy Policy Version.
- This data acts as evidence of compliance during audits or at the user's request for their consent history.
Notifications & Security
Security Features
- Data Encryption: Every consent data entry shall be encrypted to the utmost confidentiality.
- IP Anonymization: The IP address of a user has been anonymized before being stored to comply with GDPR rules.
- Prevention of Unauthorized Script Injection: The script will not work unless consent is already in place.
Maintenance & Updates
ConsentBit is regularly updated to ensure compatibility with Webflow and evolving privacy regulations. These updates are performed automatically, but you might want to check the Changelog section within your dashboard now and then for new features or improvements.
Performance & Reports
Consent Data Export
You can export consent data in PDF format for auditing purposes or for verification of compliance.
Troubleshooting & FAQs
Frequently Asked Questions
What is website scanning, and how does it work?
Website scanning scans all scripts in your Webflow <head> into categories for the privacy compliance process.
What is automatic script blocking?
All non-essential scripts (analytics and marketing tools) are blocked automatically until user consent.
Which third-party cookies are blocked?
All non-essential third-party cookies and scripts, including popular ones like Google Analytics, Facebook Pixels, and Hotjar, are blocked until consent is given by a user.
What is geotargeting?
Geotargeting allows you to customize the consent banners based on the location of the visitor.
How to cancel ConsentBit plan?
To cancel your ConsentBit plan, please log in to your account using the email address registered with your account, and follow the on-screen instructions to cancel your subscription.
Which languages does ConsentBit support for consent banners?
ConsentBit now supports consent banners in English, Dutch, German, French, Italian, Portuguese, Spanish, and Swedish, ensuring accurate and legally compliant messaging for multilingual audiences, particularly in European markets.
Google Tracking Methods
To properly track analytics in GA4, set up Google Tag Manager with a GA4 configuration tag using your Measurement ID, track important events like form submissions and button clicks, enable enhanced measurement for automatic interactions, link GA4 with Google Ads for conversion sharing, implement Consent Mode v2 for compliance, and verify tracking with Tag Assistant and GA4 DebugView.
Choose Your Tracking Method
Google offers two main ways to implement GA4 tracking:
- Direct gtag.js Integration - Lightweight, but less flexible.
- Google Tag Manager (GTM) - Recommended for flexibility and consent handling.
Google Analytics (GA4) is the tool that collects and reports data (page views, events, conversions, users, etc.).
1. Log in to Google Analytics
2. Select your GA4 property (make sure you’re not in a Universal Analytics property — those IDs start with UA-, GA4 IDs start with G-).
3. Go to: Admin → Property column → Data Streams → Select your Web stream.
4. In the stream details:
- Measurement ID → something like G-XXXXXXX.
- Tagging Instructions → Click “View tag instructions” → then Global site tag (gtag.js).
5. Copy the full snippet.
6. Place it in your site’s <head> (before </head>).
To import conversions and share audience data with Google Ads
Link Google Ads with GA4
1. Sign in to Google Analytics (GA4).
2. Go to Admin → Property column → Product Links → Google Ads Links.
3. Click Link → select your Google Ads account → Next.
4. Choose settings:
Enable Personalized Advertising (for remarketing audiences).
Enable Auto-tagging (so GA4 knows which traffic comes from Google Ads).
5. Click Submit
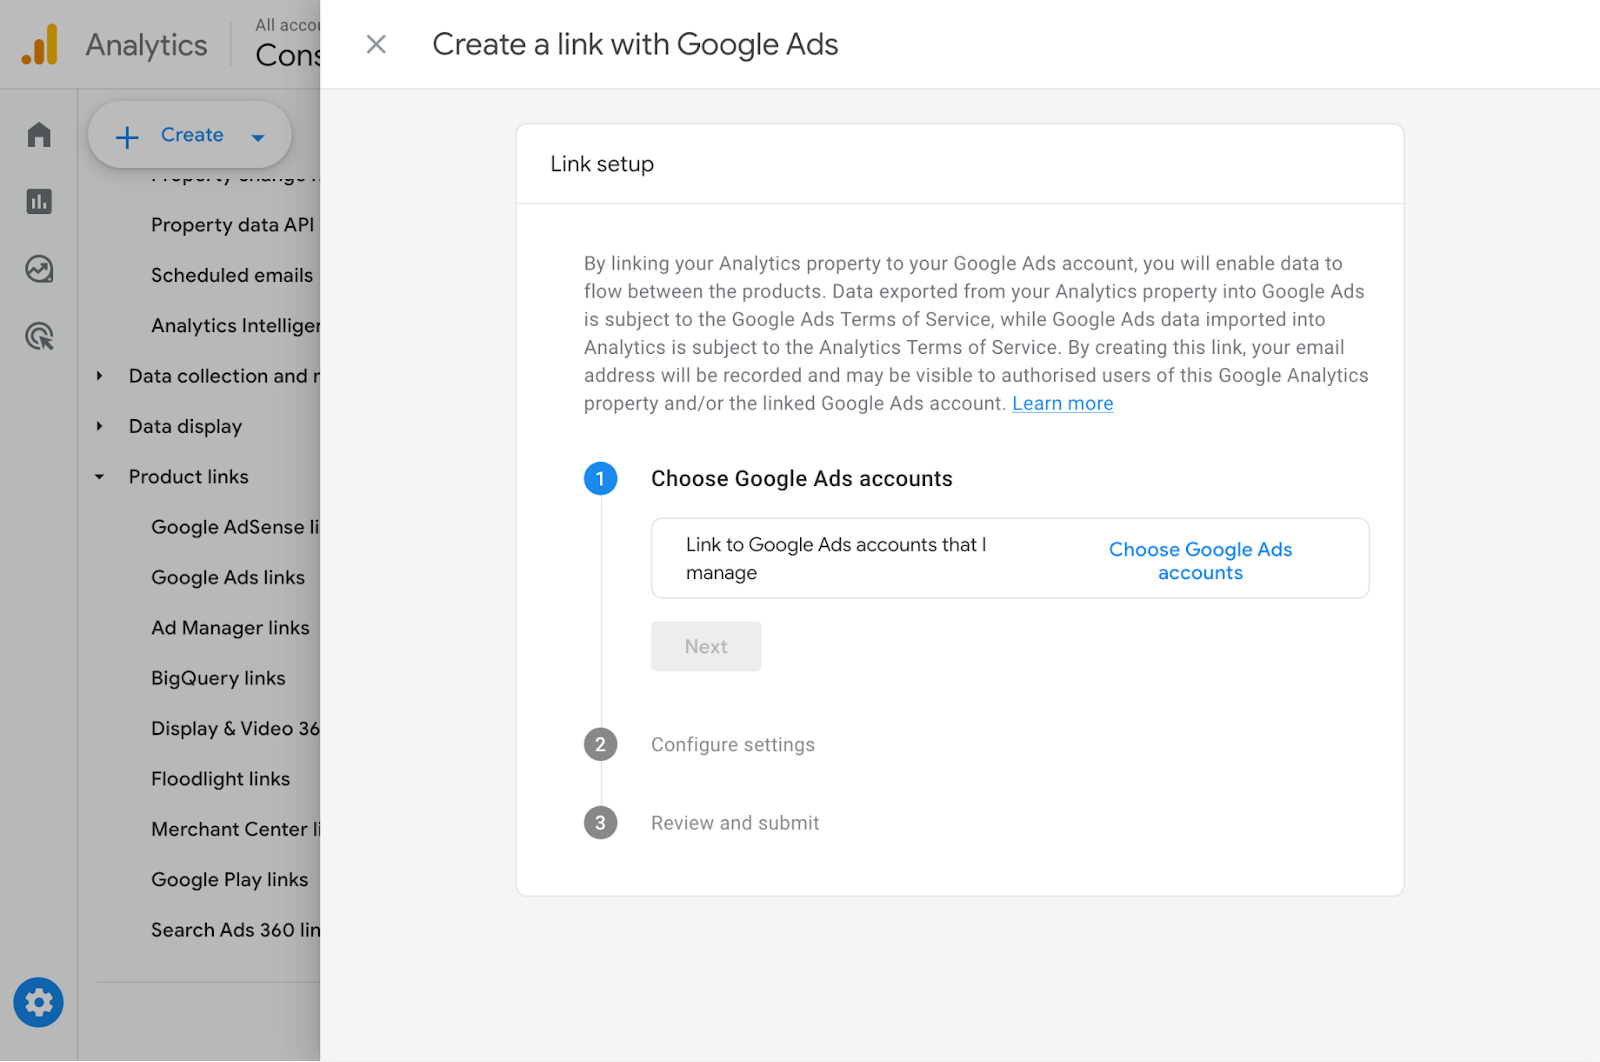
Once linked, you can send GA4 events (like purchase, generate_lead, sign_up) into Ads.
1. In Google Ads, go to Tools → Conversions.
2. Click New Conversion Action → Import → Google Analytics 4 properties.
3. Choose Web or App conversions → Select the events you want (e.g., purchase).
4. Click Import & Continue. Now Ads will optimize for those GA4 conversions.
5. If you want to run Ads remarketing or conversion tracking directly, you can also add your Ads account’s Conversion ID into GA4 via gtag.js:
If you're using Google Tag Manager (GTM), a container for managing tags (like GA4, Google Ads, Hotjar, Meta Pixel, etc.), you can add/edit tracking without changing your website’s code each time.
To set up GTM:
1. Go to Google Tag Manager.
2. Click Create Account.
3. Enter an Account Name.
4. Enter a Container Name (usually your website domain).
5. Choose the Target Platform, Web.
6. Click Create and accept the terms.
7. Copy the GTM code and paste it:
- The first part after the <head> tag.
- The second part after the opening <body> tag.
.webp)
Add Google Ads Tag in GTM
1. Go to Google Tag Manager → your container.
2. Click Tags → New → Tag Configuration.
3. Select:
Google Ads Conversion Tracking (for conversion events).
Google Ads Remarketing (if you want remarketing audiences).
4. Enter your Conversion ID (e.g., AW-123456789). For Conversion Tracking, also enter the Conversion Label.
.webp)
5. For site-wide remarketing → trigger = All Pages.
6. For conversions (e.g., form submission, purchase) → trigger = a specific event:
Example: Form Submission Trigger .
Example: Thank You Page View.
.webp)
Help & Support
Where to Get Help
Visit our landing page for guides, FAQs, and other resources, or write to our support team at support@consentbit.com for personalized assistance.

